Conrolling RaspBMC with an IR Remote
What You Will Need
- A Raspberry Pi with Raspbmc already installed (see here
for details)
- A terminal program such as PuTTy to get command line access
to the Pi.
- An IR module
- A breadboard and jumper cables
OR
- Jumper cables with male and female ends if you want to wire
straight to the Pi Board's GPIO pins.
You can get the IR module fairly easily from eBay. I bought two for the
princely sum of £2.55 inc P&P so I had a spare in case
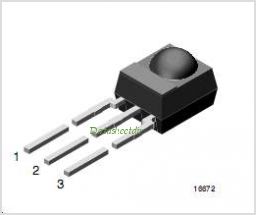
something blew up. The module I got was a TSOP4838.
Pin 1 is the signal line.
Pin 2 is the Ground
Pin 3 is Power.
Connecting
the IR Module to the Pi
So amazingly simple even I got it right first time!
- Pin 1 connects to a GPIO pin. by default, the IR software
in the Pi defualts to pin 18. Unfortunately GPIO18 was in use for the
LCD display, so I connected it to GPIO11 instead.
- Pin 2 connects to any of the ground pins on the Pi
- Pin3 should connect to one fo the 3v3 pins on the Pi (NOT
5v)
and that's it!
to put it in a nice table:
| IR Module Pin number | IR Function | Pi Function | Pi Pin Number |
| 1 | Signal | GPIO 11 | P1-23 |
| 2 | GND | GND | P1 25 |
| 3 | 3V3 | 3V3 | P1-01 |
Configuring the Pi
- the software for controlling the IR module, called LIRC,
should be already installed as part of the RaspBMC build but for
testing purposes, we are going to turn it off for now.
- In XBMC, go to Programs,>RaspBMC Settings
- Scroll to the IR Remote Section
- Ensure that "Enable GPIO TSOP IR Reciever" is disabled.
- use your terminal program to SSH to the Pi's command line
- type 'sudo
nano /etc/modules' and press enter
- Add the following lines
lirc_dev
lirc_rpi
gpio_in_pin=11
Change the gpio_in_pin to whichever GPIO pin you connected the IR
receiver module to.
- use "CTRL+X" to exit and save the file.
- type 'sudo
nano /etc/lirc/hardware.conf"
- Change the file to the following (changes in red):
########################################################

# /etc/lirc/hardware.conf


#


# Arguments which will be used when launching lircd


LIRCD_ARGS="--uinput"


# Don't start lircmd even if there seems to be a good config file


# START_LIRCMD=false


# Don't start irexec, even if a good config file seems to exist.


# START_IREXEC=false


# Try to load appropriate kernel modules


LOAD_MODULES=true


# Run "lircd --driver=help" for a list of supported drivers.


DRIVER="default"


# usually /dev/lirc0 is the correct setting for systems using udev


DEVICE="/dev/lirc0"

MODULES="lirc_rpi"


# Default configuration files for your hardware if any


LIRCD_CONF=""


LIRCMD_CONF=""


########################################################
- use "CTRL+X" to save and exit
- Reboot the Pi
- Reconnect to the Pi using SSH.
- Type 'sudo
modprobe lirc_rpi' and press Enter
- Type 'sudo
kill $(pidof lircd)' and press Enter
- Type 'mode2 -d
/dev/lirc0' and press enter.
- Now point your remote (any remote will do) at the ir module
and press buttons. On the terminal screen(not the TV!) you should see a list of entries for "space" and "jump" followed
by random numbers. This shows that the sensor is picking up the signal
from the remote.
If you are getting no response, check the wiring to the IR module an
that you have correctly set the pin number in etc/modules.
I spent several minutes in confusion before rembering that the pin I
had specified was actually connected to my LCD panel and the display on
the LCD had gone completely bonkers.
Configuring the Pi
This bit can either be really easy or fiendishly complicated, depending
on the remote control you want too use. I have a One-For-All remote you
can pick up at any electrical retailers. It's one of those programmable
remtoes that can handle multiple devices. I programmed the media center
option for a standard Microsoft MCE remote (code 2727 if you need it)
This was the best option for me as this remote also controls my TV, my
Blu-Ray player and my amplifier, so adding one more function made more
sense. If you have a remote you want to use, you can use the 'irrecord'
command to record the keypresses on your remtoe and assign them to
specific functions. I am not going into the process on how to do that.
I've done it once and I still have nightmares about it.
To enable the remote control in XBMC, perform the following steps:
- Navigate to Programs>RaspBMC Settings
- Go to the IR Remote settings
- Ensure that "Enable GPIO TSOP IR Reciever" is enabled.
- Select the remote type. in my case, I used 'MCE
RC6 Controller'
- if you have generated your own controller codes using the
irrecord function, select "Custom (lircd.conf)'
- select OK
- Congratulations! You should now be able to control your Pi
with your IR remote control